There are many tubing installation options available for installing radiant floor heating. In fact, this is one of our most common questions. Depending on the application, you may have several different options to choose from. This page details many of our most popular radiant tubing installation practices including:
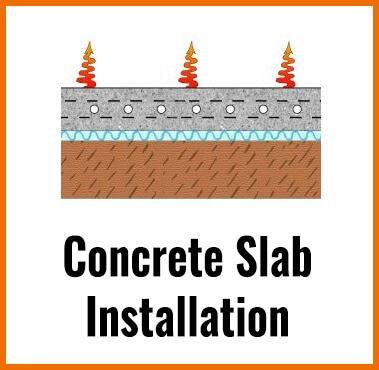
THE CONCRETE SLAB RADIANT FLOOR HEATING INSTALLATION
The concrete slab installation is one of the simplest and most efficient ways to install radiant heat. While it is simple, it is very important to do it correctly. If it is not, you can have a floor heating system that is inefficient, costly to operate, and may not work at all. Here are some general guidelines to follow. Keep in mind that these recommendations are general in nature and you should always consult your code official for proper installation.
Preparing the Concrete Slab for Radiant Floor Heat
Vapor Barrier
On top of your compacted earth or sand, you should install a vapor barrier. 6 or 8-mil Visqueen plastic (polyethylene plastic) has always been the material of choice. Studies show that this may not be effective as other options. You should check with your code official for code compliance. This website is a good resource for why and how to install the vapor barrier.
Insulating the Concrete Slab
Once the vapor barrier is in, you should insulate the slab from the earth. Extruded or expanded polystyrene (rigid blue or pink board) is the material of choice. Typically, we recommended 2″ but some states now require 3″ or R-15.
Some promote the use of thin sheets of foil/bubble or an insulating blanket. These products claim a high R-value but most of this comes from its reflective properties. You lose the reflective properties of the material once you pour concrete over it. Then, you are stuck with a 1/2″ of true insulation. This is a quick and easy product to install but in this case, quick and easy definitely isn’t the way to go.
Crete-heat is the name of one product that many of our customers use. This product has nubs on top to hold the tubing in place. All you have to do is walk the tubing in place, step it down between the nubs and keep going. There is no need for spending extra time bending over and tying the tubing to the mesh or rebar. Crete-heat has a built in vapor barrier and is tongue and groove so it snaps together. There is no need to tape any of the seams.


Since much of the heat loss in a concrete slab actually occurs on the outer edge, it is important that we insulate there as well. Here are a couple of details. The first shows what happens if only the side edge is to be insulated. The second depicts the proper way to insulate a concrete slab when used for radiant underfloor heating. Keep in mind that some will insulate the side edge all the way down to the footing.
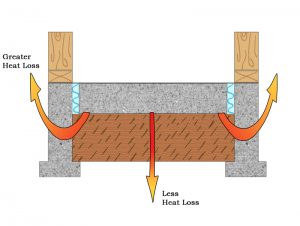
Slab partially insulated.
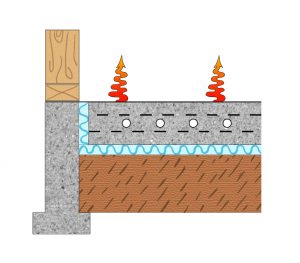
Slab fully insulated.
For more details on insulating methods, please read our Design and Construction Suggestions Manual.
Install the Radiant Floor Tubing
Once the insulation is in, the next step is to layout the radiant tubing. If you install the Crete-heat product then this part is easy. Simply step the tubing into the nubs. If you used traditional foam board then you still have a couple of options. Some will staple the tubing down to the foam using Pex staples and a special gun which makes the work go quickly. The only downfall is that the staples can be somewhat expensive.
Another option is to attach the tubing to the wire mesh or rebar using zip ties. This is the most common method because the zip ties are inexpensive and most are willing to sacrifice a little time if it means saving a lot of money.
GET A FREE QUOTE FOR THE CONCRETE SLAB RADIANT FLOOR INSTALLATION METHOD!
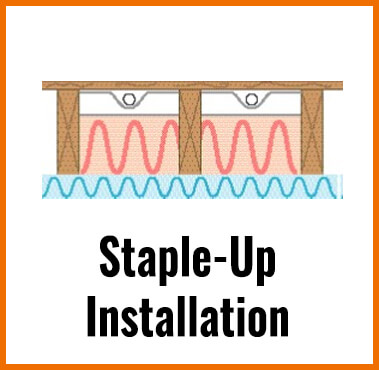
THE STAPLE-UP RADIANT FLOOR HEATING INSTALLATION
The staple-up radiant floor installation method is very popular because as long as you can see the joists from below, you can install radiant heat. This method works well for new construction and retrofits. In fact, it works so well that it has almost entirely replaced the thin suspended slab applications (see below). While the slab application is pretty forgiving, it is our opinion that a staple up installation needs to be done exactly right for it to work properly. The following methods MUST be followed to have and effective and efficient staple-up installation: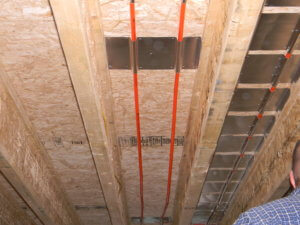
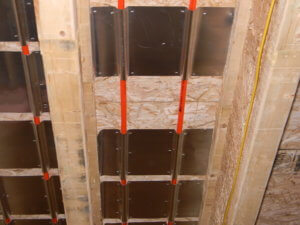
Installed aluminum heat transfer plate.
Install Aluminum Heat Emission Fins:
These are also called heat transfer plates or aluminum fins. A study conducted by Kansas State University some years ago showed that systems using heat transfer plates vs. systems that do not are able to transfer twice as many btu’s. The significance is that you can typically lower the water temperature and reduce cycle times which can lower your operational cost.
Radiantec also conducted our own plate study experiments and you can find the results here. The most cost effective solution is to install the thin heat transfer plates in continuous coverage. We did find that the thicker, extruded aluminum plates transferred about 6% more heat but at more than double the cost.
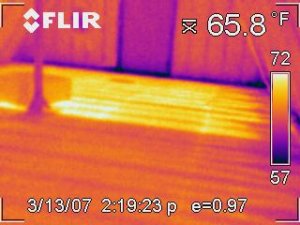
Staple-up radiant install showing difference in plated vs. un-plated areas.

This picture shows the benefits of full aluminum heat transfer plate coverage vs. spacing them out. Both areas were on the same zone and operated for the same amount of time.
Ideally, the heat transfer plates should be spaced continuously but they don’t have to be. Our general rule of thumb is to space the aluminum plates continuously in carpeted rooms, bathrooms, and high heat loss areas such as great rooms. Space them about every 8″ or so in all other areas.
Detail showing the plates spaced apart.
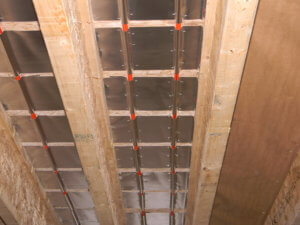
Aluminum heat transfer plates in continuous coverage.
Install An Aluminum Reflective Barrier:
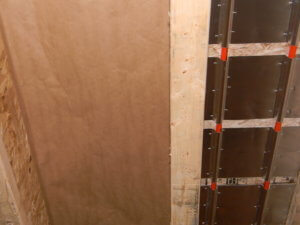
Photo of aluminum reflective barrier installed in one joist bay for radiant floor heating.
Insulation is usually put in after this (see next step) so if you can find a foil faced insulation with high enough R-value, you can forgo this product.
Install Insulation
Many people ask us if it’s necessary to also install insulation below the radiant tubing, heat transfer plates, and reflective barrier. If you can only do this once because the ceiling will be finished then the answer is absolutely yes. The amount of insulation is dependent on what is above and below. If there is carpeting or a high heat loss area above then you should put in R-19. If not, you can probably get away with R-13 but R-19 is better. The type of insulation doesn’t really matter all that much.
Staple up insulation detail above a crawl space.
If there is an unheated basement below then you should use R-19. Most people don’t mind if they lose a little bit of heat downward in this scenario. If the heat loss downward is entirely wasted to a crawl space, for example, then your insulation method should be extensive. You should try to get in a minimum of R-30. Some will insulate between the joists with fiberglass and then seal the entire underside with rigid foam.
If the ceiling will not be finished, some will wait and see how the system performs and then add the insulation after if necessary. What can happen if you don’t insulate? Since radiant heat will go in all directions, the heat will just as easily go downward. The basement will get too warm and you won’t get enough heat into the space above.
Will a Radiant Floor System Without Aluminum Heat Transfer Plates Work?
We get this question a lot because let’s face it, people want to save money. Aluminum is expensive. We get it! Radiantec considers itself to be an “energy efficiency” company. Everything we do and everything we quote is for the sole purpose of creating the most energy efficient system possible.
We also adhere to the “keep it simple” approach so we only quote components that we believe are truly necessary. This in turn will save you money every single day that you operate the heating system. So, in our opinion, it’s foolish to save a little bit of money up front and forgo an essential element that will save you money forever.
Will a radiant system without aluminum plates work? The best answer is “maybe.” If plates are not used then you are relying on air and the few locations where tubing is in contact with the floor to transfer the heat. The problem is, air is an insulator and Pex directly in contact with wood is a poor conductor. In order to make up for this poor heat transfer, the water temperature must be raised significantly. In some cases, as high as 180 degrees F.! Even then, on a cold day, the floor may not put out enough heat to heat the room if the home is older and not energy efficient.
In new construction with today’s well insulated structures, a system without plates will more than likely work. But, it won’t work as well or as efficiently as it could. Also, you may not be able to use a water heater as the heating source because the system requires much warmer water to make up for the poor heat transfer. In turn, your project may not be a great candidate for a solar hot water assist, either. What makes more sense, to install a system that can operate at lower temps (around 120-130 degrees F.) or to eliminate components that make you run the system at high temps (around 180 degrees F.)? It’s also easy to tell which system will cost less to operate.
We get calls on a daily basis from people with existing systems (not ours) that are looking to improve the performance. They complain of not getting enough heat on cold days and/or high energy costs. We’re thrilled when they call back later and rave about how well their system works after installing plates!
GET A FREE QUOTE FOR THE STAPLE-UP RADIANT FLOOR INSTALLATION METHOD!
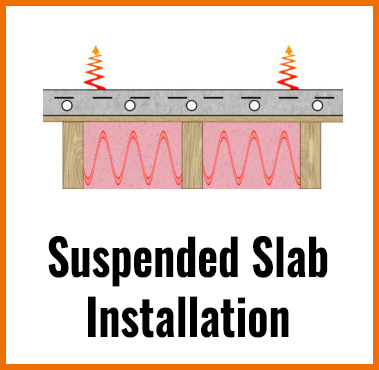
THE SUSPENDED SLAB RADIANT FLOOR HEATING INSTALLATION
The suspended slab radiant floor heating installation is sometimes used in new construction. It was once a common installation but we don’t see it used as much anymore. This method involves the radiant tubing being installed on top of the subfloor. Then, a 1 1/2″ slab is poured over the top. This slab is usually a lite-weight concrete mix or gypsum based material called “gypcrete” which seems to be the most common.
Typically, this is not a good retrofit possibility because existing homes were not engineered to withstand the added weight. Even lite-weight concrete can weigh 12-14 pounds per square foot for a 1 1/2″ pour.
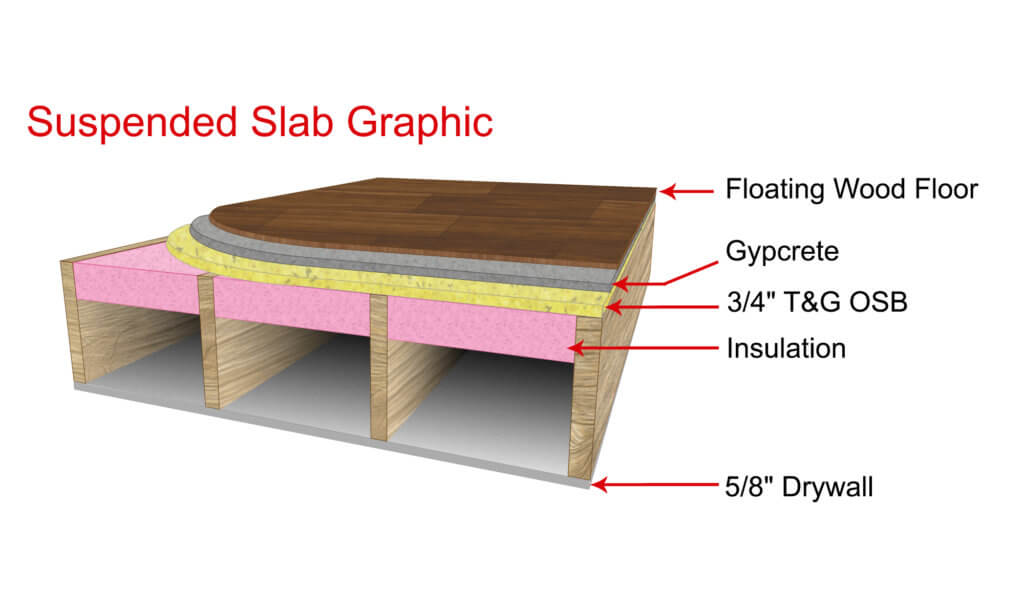
Graphic of a suspended slab with a thin gypcrete pour.
Some advantages of a suspended slab are:
- Easy tubing installation when compared to the staple-up.
- Thermal mass which is especially beneficial when using solar hot water for the heating source. The floor can be incorporated into the storage mechanism.
- Sound proofing.
- Fire proof.
- Higher heat output. In staple-up applications we can get about 35 btu/hour/sq ft whereas suspended slabs we can get up to 40 btu/hour/sq ft. Keep in mind, however, that the average heat loss in a new home is around 20 btu/hr/sq ft so this advantage may not come in to play for most installations.
- No need for aluminum heat transfer plates.
- Even and consistent floor temps.
Some disadvantages of a suspended slab are:
- Added weight. Your floor structure needs to be engineered to take this additional weight.
- Added height. As long as the suspended slab is planned from the onset, there are no issues. We’ve had people, after the fact, decide they want to do a suspended slab when the additional 1 1/2″ hasn’t been planned for.
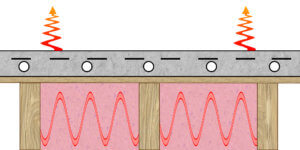
- High thermal mass. While this is also advantage, this system takes a long time to respond to new inputs of energy. It also takes a long time to cool down for those times of year when it’s cool in the morning yet warm in the afternoon.
- Cost. Depending on where you’re located, this installation can be costly.
Suspended Slab Installation Process
Graphic of a suspended slab installation.

Pouring Maxxon Therma-floor over radiant tubing. Photo courtesy of Maxxon.
GET A FREE QUOTE FOR THE SUSPENDED SLAB RADIANT FLOOR INSTALLATION METHOD!
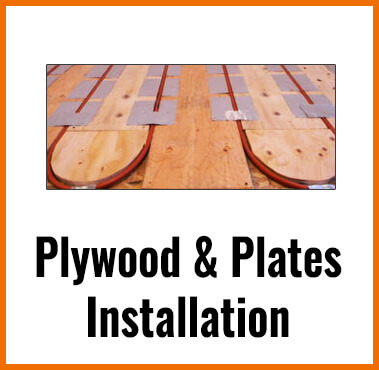
PLYWOOD AND PLATES RADIANT FLOOR HEATING INSTALLATION
Many people ask the question “how can I install radiant floor heating if I don’t have access to the floor from below?” One way is to go with a manufactured grooved board system that you can put down and simply lay the Pex in it. These products typically have a layer of aluminum on the surface for optimal heat transfer.
While these products work very well they all have one common fault: they are just too expensive for the average homeowner to even consider at prices of $8-$10 per square foot. This price doesn’t even include any of the radiant material.
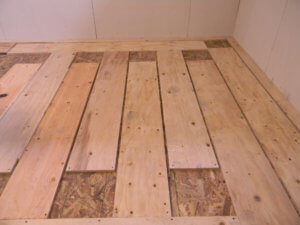
Plywood strips installed on top of subfloor.
Radiantec has come up with a practical alternative to these expensive products. If you are a competent do-it-yourselfer and don’t mind working with power tools then you can install a highly efficient radiant floor heating system on top of your existing floor for a fraction of the price of the manufactured panel systems.
The “plywood and plates” installation involves ripping 3/4″ plywood into strips 12″ wide and securing them to the subfloor. You will leave a groove just wide enough for the tubing and plate which will be roughly 3/4″.
Before the tubing is installed, an aluminum heat transfer plate is installed to help conduct heat through the floor. Now, the tubing can be installed and the finished flooring put in. If the floor covering will be soft, carpet or vinyl for example, then a thin layer of wood (called luan) should be installed. Most other hard flooring can be installed directly over the tubing and plates.
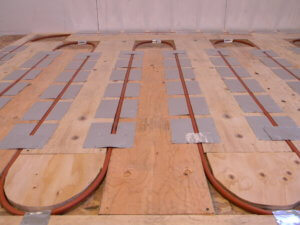
Plywood strips, tubing, and plates installed on top of subfloor.
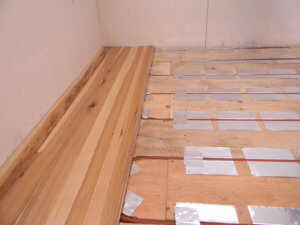
Floating floor installed over radiant floor heating installation.
GET A FREE QUOTE FOR THE PLYWOOD AND PLATES RADIANT FLOOR INSTALLATION METHOD!
To see more common tubing installation methods, be sure to read our Design and Construction Manual.